You can tell if mongoose is already connected or not by simply checking:
|
Tuesday, June 25, 2013
Check if Mongoose it's already conected


Monday, June 24, 2013
Error ! [rejected] master -> master (non-fast-forward) on Heroku/Git
This error can be a bit overwhelming at first, do not fear.
Simply put,
Simply put,
git push -f https//github.com/user/repo.git to force the upload.Tuesday, June 4, 2013
Mini Tutorial Node.js, Express, and Jade.

I was having some problems deploying some jade web pages over Node.js with Jade template engine.
So
I'm leaving a small tutorial for not forgetting what i have done so
far...
Let's see first install everything we need:
>npm install express
>npm install jade
|
Now we have the pieces lest make the directory structure for this project, just add the directories "views" and "public" we will save the static things in public, like JavaScript and CSS files and jade views in views. Pretty obvious right...
Now
lets write some server code...
var app = express();
app.configure(function(){
    app.set('port', process.env.PORT || 3000); //set the port
    app.set('views', __dirname + '/views'); //set views dir
    app.set('view engine', 'jade'); // set the template engine
    app.use(express.favicon()); //set the favicon
   app.use(express.static(path.join(__dirname, 'public'))); //set the public dir for static content
});
app.get('/', function(req, res){
  res.render('index.jade', {title: 'Jade Example'}); //sends title to the template and renders it
});
app.listen(3000);
|
Let's
make some views...
First
the layout: layout.jade
!!! 5
html
  head
    title= title
    link(rel='stylesheet', href='/css/bootstrap.css')
    link(rel='stylesheet', href='/css/bootstrap-responsive.min.css')
  body

   header.site-header
     a.logo(href='/', title='Express, Jade and Stylus') Express, Jade and Stylus
       nav.site-nav
         ul.nav
           li.current
             a(href='/', title='Home') Home
    block content
p
  | Created by
  a(href='http://http://grimaldigerardo.blogspot.com.ar/') Gerardo Grimaldi
|
Then
a simple index: index.jade
extends layout

block content
  h1 = title
  p Welcome to #{title}
|
The
bootstrap css it's inside the public directory in:
'/public/css/bootstrap.css'
All
ready, let's take it for a spin...
node app.js
|
Bye
Monday, May 27, 2013
Let's send some mails via Node.js
In my Android app I'm having a unique comments section from the users to contact me, they send comments and messages to my mail via this layout...
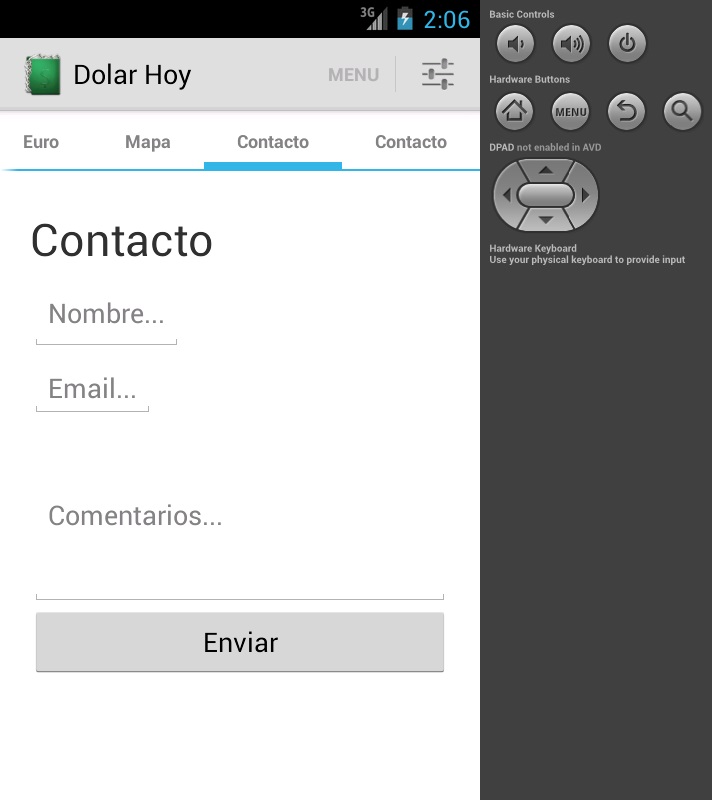
Now lets see i want to send a mail, with this three fields, to myself, via my app... I know!
An get request to a server, sending this three fields in a mail to myself!
Let's do this... first of all... lets fins a library that sends mails
bingo! Nodemailer it s very appropriate for this task...
https://github.com/andris9/Nodemailer
https://npmjs.org/package/nodemailer
Lets's install it..
I use Cloud9 for developing in Node.js the pros are enough and the ide just IDE just works it coud debug in real time, and it got an console with some practice you can make a server and deploying it in no time, now lets see install node mailer.
Node has npm (node package manager) it resolves the dependencies via the Package.json or installing the stuf directly into the app via the npm install <name_of_the_library>, we gona use that for our app.
Just get inside the console and type : npm install nodemailer
This will install the necessary stuf for call the library inside the app.
Now let's make a js file that sends files
var nodemailer = require("nodemailer");
var smtpTransport = nodemailer.createTransport("SMTP",{
service: "Gmail",
auth: {
user: "me@gmail.com",
pass: "pass"
}
});
var mailOptions = {
from: "Server <me@gmail.com>", // sender address
to: "me@gmail.com", // list of receivers
subject: "", // Subject line
text: "", // plaintext body
html: "" // html body
};
exports.mailOptions = mailOptions;
exports.sendMail = function () {
smtpTransport.sendMail(mailOptions, function(error, response){
if(error){
console.log(error);
}else{
console.log("Message sent: " + response.message);
}
/* if you don't want to use this transport object anymore, uncomment following line
//smtpTransport.close(); // shut down the connection pool, no more messages*/
});
};
Note: This example is almost identical to the one in the page of the library in Github my server is set in this one.
Now this library exposes itself like a public atribute in a class via the "exports". I assign to them the the methods and properties I want to access from another js file in this case the server one I want for principal obviously requiring it first...
Let's go for the server itself...
Bye.
Let's go for the server itself...
var express = require('express');var mail = require("./nodemail");var app = express();
app.use(express.logger());
app.get('/mail/:name/:subject/:text/:securitytoken', function(req, res) {
if (req.params.securitytoken != 'Salt742!') return res.send('Error: Wrong password...'); try { newMail(req.params.name,req.params.subject, req.params.text); } catch(err) { onError(err); }});
app.listen(process.env.PORT);
function newMail(name, subject, text) { mail.mailOptions.subject = 'Message from User: ' + name + ' with Subject : ' + subject; mail.mailOptions.text = text; mail.sendMail();}
function onError(err) { console.log(err);}
console.log('Server HTTP Listening on port ' + process.env.PORT + '...');
Well I'm gona explain this mess:
- First we use 'express' for listen to the get requests.
- In the get request we read the fields im sending from the app an one security token
- First of all we read the token and compare it to the one we got.
- Then we load the the data in the function newMail this one will set the values in the nodemail.js
- After this we call the function in nodemail.js that will trigger the mails.
Well people that's all for now. I want some feedback, so please let me know if this is useful for you people out there. Or what would you like to see next in the blog.
Bye.
Saturday, May 25, 2013
Next app...
 I'm having a new app deploying to the Android Play Store. This experiment it's a result of Node.js, Heroku and Android.
The app gets his resources from a scrapper in node.js, with a timer for working some times in the week, i will give some explanation of how this works later on.
The app saves every value the app needs into a MongoDB database, and the second server delivers this data to the Android client via Json and Rest techniques that gives some velocity to develop of the server and adds simplicity that can be lost in more complex models. This is all for now I'll post some code in short.
Bye
Deploying my little node.js server to Heroku
Once I got every piece of my app in node.js working.
I though on deploying and the best way to do so for me for the scalability and easiness only Heroku comes to my mind:

So lets prepare the environment:
First we open an account on https://www.heroku.com/
Once we have it we need to install the Heroku client the tools for making a deploy https://toolbelt.heroku.com/
Now lest start...
Lets strep into the folder :
>cd myapp
Add everyting to git:
>git init
>git add .
>git commit -m "first commit"
In case of not having an app
>heroku create
In the case of having an app lets add it wit the name
>heroku git:remote -a myapp
The app needs two things before the upload a:
"name": "NodejsServer",
"version": "0.0.1",
"dependencies": {
"express": "3.1.x"
Now lets deploy, it's so simple as this...
>git push heroku master
Heroku alone will install the dependencies via the data in the Package.js and then run the app from server.js as it says in the Procfile.
Happy deploy.... bye!
I though on deploying and the best way to do so for me for the scalability and easiness only Heroku comes to my mind:

So lets prepare the environment:
First we open an account on https://www.heroku.com/
Once we have it we need to install the Heroku client the tools for making a deploy https://toolbelt.heroku.com/
Now lest start...
Lets strep into the folder :
>cd myapp
Add everyting to git:
>git init
>git add .
>git commit -m "first commit"
In case of not having an app
>heroku create
In the case of having an app lets add it wit the name
>heroku git:remote -a myapp
The app needs two things before the upload a:
- Procfile : A single file indicating wich file the server must start, with the command web: node server.js
- And a Package.json a json structured file indicating name version and package dependencies it must be something like this
"name": "NodejsServer",
"version": "0.0.1",
"dependencies": {
"express": "3.1.x"
},
"engines": {
"node": "0.10.x",
"npm": "1.2.x"
}
}
Now lets deploy, it's so simple as this...
>git push heroku master
Heroku alone will install the dependencies via the data in the Package.js and then run the app from server.js as it says in the Procfile.
Happy deploy.... bye!
Subscribe to:
Posts (Atom)
-
I was very busy with some configuration for a friend's blog on Blogger. She was paying a fee for the DNS redirect from her national DNS...
-
You can tell if mongoose is already connected or not by simply checking: if(mongoose . connection . readyState){ } 0 = no 1 = yes...
-
Handbrake it's an open-source video transcoder and a lifesaver! For people that don't have a lot of time for transcoding or don...

